Monday, 31 January 2011

Cloud Dough

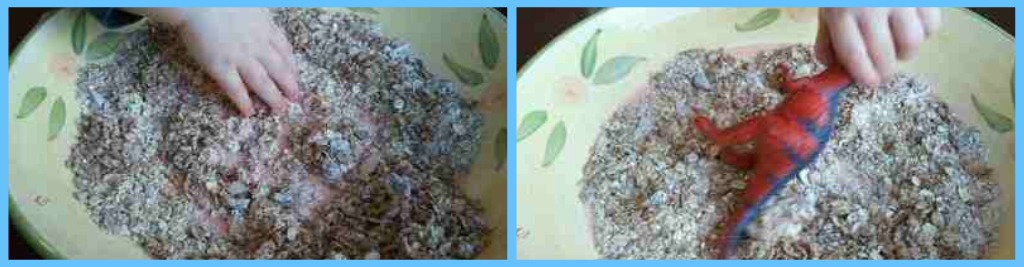
This was one of many activities I have had suggested to me by a great reception class teacher. I love to sit with the children and get our hands buried into something messy. Little man was able to get his hands in first to get used to it before P dived in with some of her toys. 
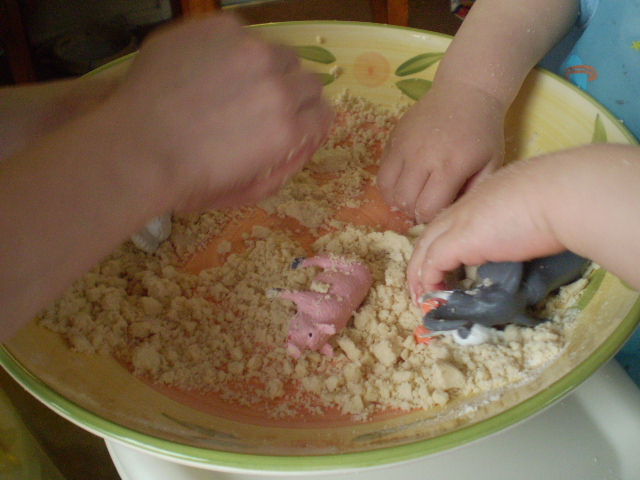
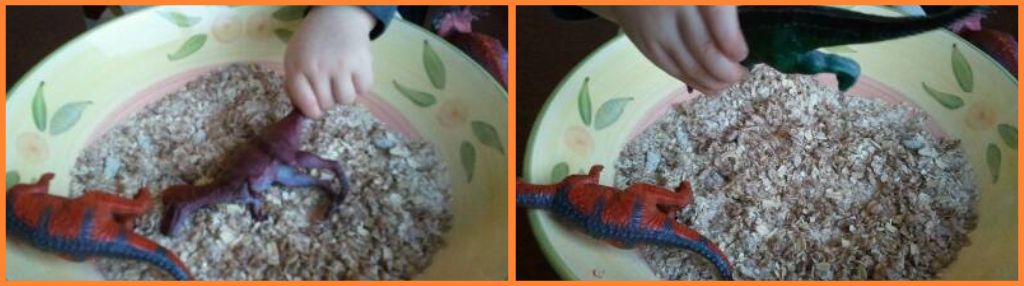
While little man was busy flicking the dough up using the animals and feeling it with his finger tips P was sqeezing the dough into balls. Accord to P the dough felt like wet sand and held its shape pretty well. Little man was soon trying to grap P's balls and squash them so in the end P pushed them down on to the bottom of the fruit bowl. After a little bit of a hint from mummy P passed her brother an animal and showed him how to make animal prints in the dough.
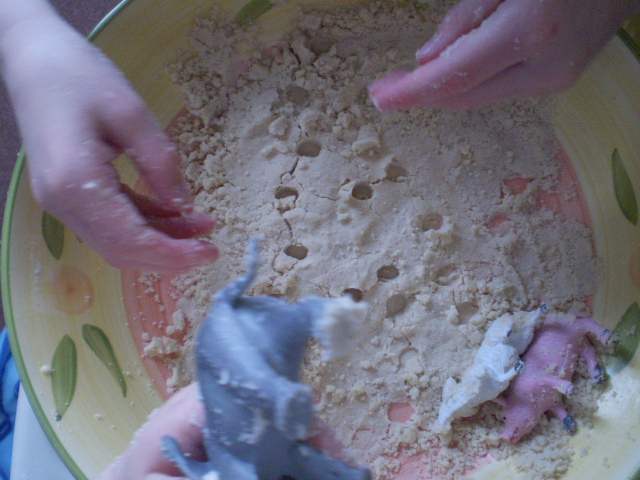
By the end of the activity little man had tried to eat quite a bit and had it all around his mouth while P had managed to get more on the floor than she had kept in the bowl. Never heard of cloud dough?
Here's the ingredients: 
1 part baby oil
8 parts plain flour 


If you would like more ideas of sensory activities which you can do with your little ones please check out our first Ebook. The book has recieved some good responses and we hope that it will become a useful tool for lots of families. To find out more or to purchase click here

 
Please feel free to share your fun activities below and help your self to a badge.


Sunday, 23 January 2011

Tiger Mask


Tonight Lady P decided she wanted to make a something using her animal print sponge and I suggested a animal mask. She jumped at the thought and we dug out the bits we needed and got stuck in.

 Materials: animal tissue paper, scissors, paper plate, felt tips, glue and elastic.


Step 1. Measure the space between your child's eyes on the plate and cut out the holes

Step 2. Ask your little ones to draw the nose and mouth for their animal using a pencil or felt tip pen.

Step 3. Once this is done a pair of ears would look lovely too. One of P's ideas, more foam of course but card or paper would also do a trick. P used the paper plate to measure what size she would like them to be.


Step 4. Then she cut these out and popped them on the plate with a little glue. Here it is so far!


Step 5. After this P cut the animal print foam into piece and glue them on to the paper plate covering as many gaps as she could.
Photobucket

Monday, 17 January 2011

Dinosaur World

I love simple activities, they take less prior planning and have the potential to be lots more fun! A great acitivity escepecially for under twos is this one. We did this on Sunday and little man enjoyed spending half an hour playing with his dinosaurs.

Its been a while since little man and I got have done any sort of malleable play and as a result he was more hesitant to play with it on this occasion.  When introducing little ones to different materials it is best to start off with it simple with out any toys involved, then as they get more comfortable you can add your choice of toys to the tray (or fruit bowl).


He enjoys stroking his fingers through the muesli and patting it, he loved watching the powder puffing out and once Little man had spent a while getting used to the muesli we added some dinosaurs. He bounced them up and down in the mix in between stopping to eat some of the raisins then carried on hitting them against each other and using their tails to move the muesli around.

All these materials can be found around the home or can be cheaply purchased. Monkeying Arounds first ebook contains lots of sensory ideas for tray activities to occupy under two's take a look! 

What have you been up to this week?

Saturday, 15 January 2011

Growing Roots

One of the reasons I love blogging is to share ideas, these ideas are ones which I have grown since working with and having my own children. I love the idea that children can learn so much from play with out even realising. This worked well so far with our daughter and I hope it will do the same for little man.

I lately wrote a post discussing changing the name of this blog and moving to wordpress but after speaking to other bloggers with more experience I have decided to stay put and keep the name, simply deciding to get to know blogger better and make it work for me.

So whats to come? Well I have a few ideas up my sleeve and this will start with new badges and a banner for the blog. I will of course announce when it is up and running to allow you all to grab the fab new badges and have a look around.
 Photobucket

Wednesday, 12 January 2011

Tyre Printing

I have been feeling much more myself this week after the car accident and managed to get some motivation. Poor little man and Lady P have not had a very fun mum this week and I managed to ignore the back ache long enough to play and do some crafts and play with them. Not being to energetic I sat little man at the table to start an activity which went with the theme transport which we were meant to be focusing on this week.
I had chosen some of his cars and trains with interesting tyre prints earlier in the morning. Be care to make sure these are not battery operated because they will need a good wash after (I made this mistake). so here we go:
Step 1. select some different coloured paints, I would say three are enough. Add these to a large tray.
Step 2. Dip the cars or trays into the tray and roll backwards and forwards, you may need to demonstrate this for little ones.
Step3. Move the tray out of the way, place the car on the paper and again roll around the paper.
Great fun and we will definitely be trying lots more prints in the future.
 Photobucket

Monday, 10 January 2011

Rainbow Fish


This book has always been a favourite of lady p's and mine. P loves fish and loves to read book on them both fiction and non fiction. On our last trip to the sealife centre she found it fascinating and was keen to soak up as much information as possible.

The rainbow fish book collection is great for young children as the each have a moral to them, P's Rainbow Fish story for example talks about sharing. Stories in general spark P's imagination to create some thing crafty or involving role play. I think this is due to the time she spent at nursery when she was younger.

We read the Rainbow Fish story this week end and p decided afterwards that she wanted to make and decorate her own fish using some of the craft goodies she got for Christmas.

Tools for the job:
stapler,
paper plate,
coloured paper,
glue,
googely eyes.

Step 1. P drew a triangle on the edge of the plate. Your little one can do this too, it doesn't matter if its not perfect as this Will give their fish more character.
Step 2. allow them to cut out the triangle and then staple the triangle on to the opposite edge yourself.

Step 3. P sqeezed the pva glue on to to fish and spread it around using her finger.
Step 4. Normally I would get P to cut out the shapes for the scales her self but she wanted help with this. I would judge this by the child's age. P choose blue and green paper because she said that is the normal colour for fish in our sea.
Step 5. P arrange to shapes on to the fish adding a little more glue where needed.
Step 6. Typical that the Dave find a use for her Googley eyes they are no where to be seen. Instead we drew the fishy an eye and stuck it on.

There you go your very own Rainbow Fish! What have you been up to this week? Why not add your ideas and feel free to add our badge to your blog. x

" />


Tuesday, 4 January 2011

Stain Glass Butterfly

Today was the first day back at school and as normal the house felt very quiet with out Lady P around. When she got home she was incredably hyper so I thought a little creative fun was just the ticket for her before bed time. P was given the choice to make what ever she wanted and she decided she would really like some butterflies.
I have had a piece of acetate which I have been bursting to use on an activity and this seemed like a good opportunity as any.

Step 1- We cut the A4 sheet in half and then folded it in again, we then drew a silouette for half a butterflies body using a board marker and cut them out.

Step 2-  Once they are cut out P folded her choice of colour pipe cleaner in half and wrapped it over the centre of the butterfly. The pipe cleaner was then twisted at the top to secure it and bent out for the butterflies antenas.


Step 3- P Then drew on the shapes she wanted, we discussed how the butterflies wing are symetrical and would be the same on each side. P is 5 so she understands the meaning of symetry however if you are going to be trying the activity your self this it is a good and simple way to explain it to little ones.

Step 4- Once she had drawn her shapes P paint them, this is great for hand eye coordination as P finds staying within the lines very important and loves any thing she does to be neat.

Step 5- Once these were all filled in she sprinkled on the glitter and filled in the out side with her choice of colour.

I think These beautiful butterflies may have to be stuck on my kitchen window to give me something cheerful to look at when washing up. . . thats if I can stop her from sharing them with her school friends.


Related Posts Plugin for WordPress, Blogger...